Cinemagraph
GIFs
Original
Sequence Cut Out
Cinemagraph
Cinemagraph
Using Photoshop, Premiere Pro and
FLASH
Find an interesting clip the fits the requirements of a
cinemagraph-gif.
Look for lots of moving parts from which you will extract 1
or more to display in a still life image.Categories: This is Cool, That’s Creepy, Plain Scary, Odd choice
1. Extract 1 moving
item.
2. Extract 2 in
sequence à
show 1 then show the other (as a reaction to the first).3. Extract and show 3 or more at different times
4. Bring in a sequence from a completely different movie clip- make it fit
A movie can only be loaded in to FLASH as an FLV file.
However, FLV does not do Frame sequencing which is OLD SCHOOL DV movie encoding
à
Converting
a video to keyframes requires that the video compression (its Codec) is
frame-based. But it isn't. DV - the once dominating format in camcorders, now
less so, was probably the last format that used only frame-based compression.
Some QuickTime variants too, and when you used these in Flash you could
probably use a convert-to-frames method there. Modern formats use temporal
compression which gives smaller files and better quality. This includes FLV.
Temporal compression means - in short - that most frames are constructed from
bits and pieces from previous and upcoming frames. Nowadays a videofile is a
stream of data, not a chunk of frames. This means that you can't go to a
specific frame either; there is no way in ActionScript you can say
video.gotoandstop(112); or similar - for the same reason. Instead you can
(only) seek to its nearest keyframe, video keyframe that is. Since these are
(the only) full frames in the stream, they can be displayed in a frozen state
easily. In an editing app you need to reconstruct the missing full frames
before cutting is possible. Flash doesn't have this feature, and so you can't
convert video to individual frames there. Video editing apps however will be
able to export individual frames as bitmaps, easily. This batch can be
imported to Flash. The whole process is pretty easy, and in some applications
it may be the best way to go. But you lose the efficiency of the video
compression. A video file say 2 MB in size may very likely end up as 10 MB of
bitmaps, and may not play back as smooth either.
|
to cut out the section of video you are interested in.
Run Premiere Pro and use the default settings.
Drag your movie clip onto the VIDEO1 time line (lower right in Premiere Pro)
è If the popup occurs
è
è
Choose “Change Sequence Settings”
Watch the video and choose: “{“ Mark In and “}” Mark Out
to select a specific sequence from the video
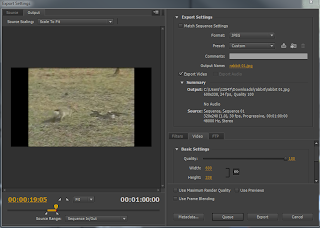
Choose FILE – EXPORT – MEDIA
Choose Source range: “Sequence In/Out”
Choose Format: “JPEG”
– you may also change the name from sequence 01 to another word but keep the
number i.e. “Rabbit 01”
Keep the width and
Height
Choose one of the Series of JPG pictures as your STILL image
copy and rename to still_image.jpg
Remove unwanted objects from the image:
NORMAL WAY à
With clone stamp: LINK
NEW SUPER COOL WAY à
With content aware fill:
LINK
You may have to “RASTERIZE” the image first before the FILL
command will show up.
SAVE as STILL_image_edited.jpgOn to FLASH
Import these JPG images into Flash.
Layer 1 import the STILL_image to the stage.
create a new layer - Layer 2
Import to stage – select first sequence image
You should get a popup
Choose YES
On the second layer edit out the parts of the movie you DO
NOT want. One picture a time. Use CTRL-B to break them apart for editing
Be as accurate as possible ( ZOOM in) and if the camera was not held steady you may
have to tweak the position of your objects ever so slightly.
Save as:
AVI or animated Gif or SWF
Post to blog


